GPI Framework Developer’s Guide
This guide introduces the various structures of the GPI framework, discusses the runtime entry points and covers some of the package dependencies for mastering a GPI distro. Its intended for GPI developers who want to make contributions to the framework in the areas of UI, deployment, runtime operation, etc… If your interested in extending the scientific algorithms used by the framework (i.e. creating new nodes), then checkout the Node Developer’s Guide as well the community page for listings of other node library projects http://gpilab.com/community/.
The Framework
The ‘framework’ and ‘core-node’ projects are separate entities. The framework provides the UI, runtime environment and build environment for the node libraries. This means the framework doesn’t provide any of the scientific algorithms itself, however, it pulls together some basic numeric packages (C++ and Python) to facilitate the development of nodes.
The repository that holds the framework project can be accessed here: https://github.com/gpilab/framework
The framework project is organized in the following directory structure:
- bin/
- doc/
- include/
- launch/
- lib/
The following sections introduce the software contained in each of these directories.
bin/
The ‘bin/’ directory holds the launching mechanisms for starting GPI (either as a GUI or a command-line utility), the command-line make, or running the updater. These mechanisms are accessed by the following scripts:
- gpi_launch
- gpi_make
- gpi_update
The scripts are fairly simple, they may take command-line arguments and generally access a section of the main gpi library (discussed in the ‘lib’ section). Their purpose is to be configurable for a specific Anaconda Python install and make OS specific changes necessary to run GPI.
For example, the following code block is take from gpi_launch:
#!/usr/bin/env python

...

import sys, os

# Check for Anaconda PREFIX, or assume that THIS file location is the CWD.
GPI_PREFIX = '/opt/anaconda1anaconda2anaconda3' # ANACONDA
if GPI_PREFIX == '/opt/' + 'anaconda1anaconda2anaconda3':
    GPI_PREFIX, _ = os.path.split(os.path.dirname(os.path.realpath(__file__)))
    GPI_LIB_DIR = os.path.join(GPI_PREFIX, 'lib')
    if GPI_LIB_DIR not in sys.path:
        sys.path.insert(0, GPI_LIB_DIR)

# gpi
from gpi import launch

if __name__ == '__main__':
    launch.launch()
The shebang at the top specifies the first python instance in the user environment should be used to start this launching script. This means that you could download the framework project and run it against any Python installation, provided it has the necessary dependencies. The subsequent bit of logic determines whether the ‘conda’ package manager was used to install GPI; if it has, then the GPI_PREFIX will point to the location of the gpi library within the Anaconda Python installation. If ‘conda’ wasn’t used then the script uses dead reckoning to determine the location of the gpi library assuming the script was initiated within the framework directory structure. This is the same basic process in each script.
doc/
The ‘doc/’ directory contains the very documentation that you are reading now. It is written in reStructuredText and is compiled using the Sphinx documentation generator. This is auto-generated for each commit and hosted by the ReadTheDocs project.
To build these docs locally (if you intend to modify them), install Sphinx and simply run:
$ make html
in the ‘doc/’ directory. Then open the relevant ‘.html’ files that have been generated under the ‘doc/_build/’ directory.
include/
The ‘include/’ directory contains the API code for a Python-C interface called PyFI. While the GPI UI doesn’t call on this code, it is provided as a portability layer for GPI nodes that depend on Python-C modules, written with PyFI C++ API. While you can still write GPI nodes with Python extension modules supported by SWIG or Boost these will be extra dependencies of your node library that will have to be communicated to your end users.
At the time PyFI was written, the aforementioned SWIG and Boost libraries didn’t yet have the capability to transfer numeric arrays between Python and C without copying the data. This was being developed in a project called Boost.NumPy, and is now part of the Boost.Python support package. PyFI also has the capability of allocating numeric arrays from Python, to be used in the embedded C routine, which circumvents the need to copy data between Python and C.
You can read more about PyFI in the Node Developer’s Guide:
launch/
The ‘launch/’ directory contains the GPI UI start-up scripts that meet the porcelain:
- GPI.desktop
- gpi.app
- gpi.command
The GPI.desktop and gpi.app scripts are converted to icon launchers for the Gnome (Ubuntu Linux) and MacOS/OSX desktops. They both eventually call on the gpi.command script which handles OS specific parameters for GPI. The launcher script’s link to the gpi.command script is not immediately obvious by inspecting these pieces of code, because there are path manipulations that happen in each of these scripts when they are part of a conda package deployment. To see how these scripts are placed in a deployment process, check out the conda deployment hook build.sh.
As mentioned above, the gpi.command script provides some unique launching parameters depending on the OS. These differences are as follows:
In OSX, the main OS menu-bar will display the name of the binary being run. Since GPI is called as a library via Python, the Python binary is soft-linked in the system’s temp directory as “GPI” before calling it to start the GPI runtime. This will cause the OS menu-bar to display “GPI” in the upper left-hand corner.
In Ubuntu Linux, there have been specific versions of the desktop environment that cause Qt to default to one of the older style UI skins. To ensure that GPI is correctly started with the look and feel consistent to that of its OSX counterpart, the “cleanlooks” style is forced as a command-line option.
lib/
The ‘lib/’ directory contains the ‘gpi’ python library. This library is pure-Python and contains all the elements of the runtime environment. The section The ‘gpi’ Python Library catagorizes and lists each of the main object classes within the ‘gpi’ lib.
Building a Distro
The GPI distributions leverage the Anaconda.org cloud for hosting GPI itself and some extra binary packages that are specifically configured for use with GPI. The supporting Anaconda-Cloud packages can be found at anaconda.org/gpi. These packages were built using the scripts that can be found in the github.com/gpilab/conda-distro project. This project has a master build script (build_all.py), that can be tailored to specific package needs such as platform dependence, Python version, release candidate, etc…
Since the gpi-framework project is pure python, it doesn’t have any platform specific building requirements. The conda package is simply a copy of the framework code with some specific launching details that are OS dependent (see the launch/ section above).
The astyle, eigen, fftw, and gpi-core-nodes packages are all C/C++ based and require platform specific compilation. This requires that the master build script is run on each type of target platform, with the necessary indicator options chosen. For example, if we want to build the framework and core-node packages, then we’d use a command like the following:
$ ./build_all.py --force-upload --auto-upload --channel gpi --tag main --python-version 35 --build-number 0 --package gpi-framework,gpi-core-nodes
This command would have to be run on both a Linux machine and an OSX machine so that Anaconda would have each platform specific version.
To ensure a GPI compatible environment, its common to use the installer script (GPI_Install_Latest.sh) to auto-install a local copy of Miniconda to run these build scripts against. This can be done on Linux and OSX.
OSX App
To create the OSX App distro there there is an additional project, for generically wrapping Miniconda based applications in OSX, called Wr[App]-A-Conda. The App can also be bundled in a .dmg file by using the create-dmg project.
These two external application packaging projects (‘Wr[App]-A-Conda’ and ‘create-dmg’) are automatically invoked by the build_all.sh script found in the osx_stack section of the github.com/gpilab/conda-distro project (provided that these two projects are in your PATH environment).
The ‘gpi’ Python Library
The gpi Python library is collection of inherited PyQt classes (for the UI), Numpy data handling libs, configuration, command-line and build system interfaces. The following sections will introduce the sub-library components within these contexts.
GUI (PyQt Classes)
The gpi modules responsible for the canvas, node menu and other dialogues are as follows:
canvasGraph.py

Figure 1 - The finite state machine model for the canvas execution.
canvasScene.py
mainWindow.py
edge.py
launch.py
layoutWindow.py
library.py
macroNode.py
node.py
-
class
gpi.node.NodeSignalMediator[source]¶ A hack to add PyQt signals to a non QObject derivative. http://kedeligdata.blogspot.com/2010/01/pyqt-emitting-events-from-non-qobject.html
-
class
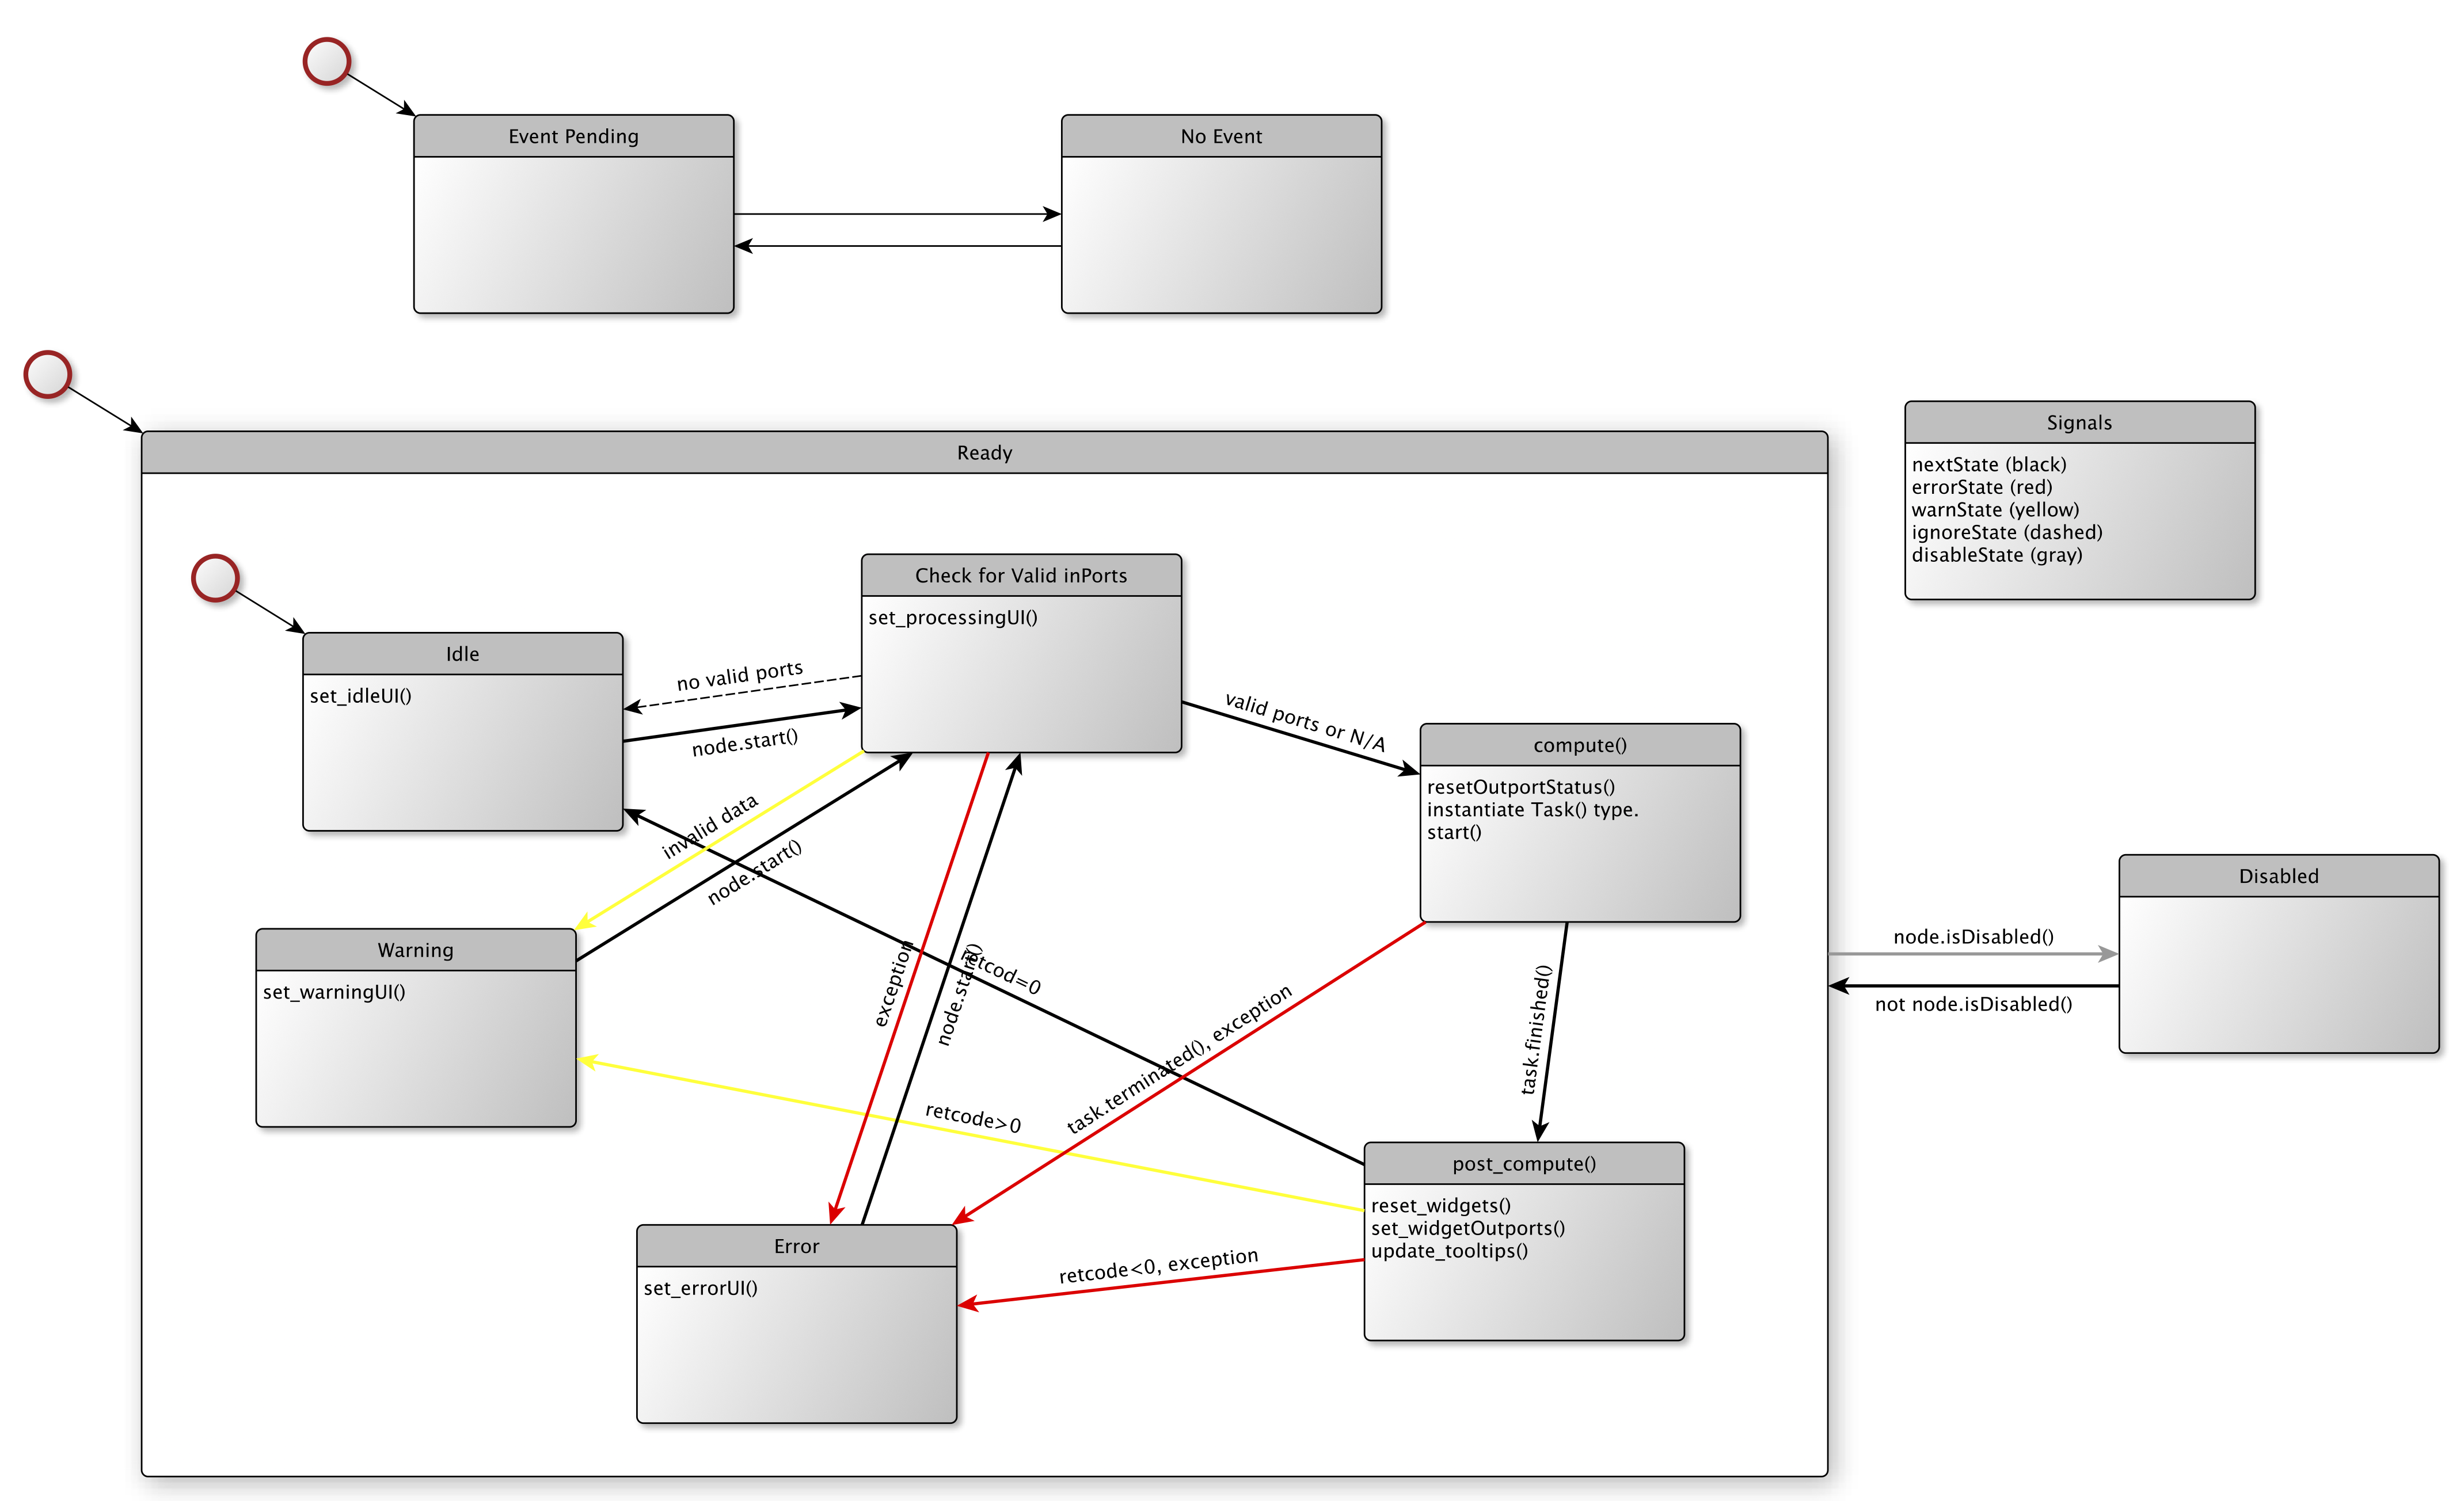
Figure 2 - The finite state machine model for the node execution.
nodeAPI.py
-
class
gpi.nodeAPI.NodeAPI(node)[source]¶ Base class for all external nodes.
External nodes implement the extensible methods of this class: i.e. compute(), validate(), execType(), etc… to create a unique Node module.
-
initUI()[source]¶ Initialize the node UI (Node Menu).
This method is intended to be reimplemented by the external node developer. This is where
PortandWidgetobjects are added and initialized. This method is called whenever a node is added to the canvas.See Adding Widgets and Adding Ports for more detail.
-
validate()[source]¶ The pre-compute validation step.
This function is intended to be reimplemented by the external node developer. Here the developer can access widget and port data (see Accessing Widget Data and Accessing Port Data) to perform validation checks before
compute()is called.Returns: 0: The node successfully passed validation 1: The node failed validation, compute will not be called and the canvas will be paused
Return type: An integer corresponding to the result of the validation
-
compute()[source]¶ The module compute routine.
This function is intended to be reimplemented by the external node developer. This is where the main computation of the node is performed. The developer has full access to the widget and port data (see Accessing Widget Data and Accessing Port Data).
Returns: 0: Compute completed successfully 1: Compute failed in some way, the canvas will be paused
Return type: An integer corresponding to the result of the computation
-
-
class
port.py
-
class
gpi.port.OutPort(nodeWidget, CanvasBackend, title, portNum, intype=None, dtype=None, ndim=None, obligation=None, menuWidget=None)[source]¶ Defines the specific behavior for connecting to outports i.e. how to check for downstream data types for scaling downstream ports on the canvas to highlight potentially valid connections.
-
class
runnable.py
update.py
widgets.py
This file contains all of the Q-Widgets that have been wrapped and simplified for the GPI interface and Node development API.
Node/Canvas Execution
functor.py
nodeQueue.py (PyQt classes)
stateMachine.py (PyQt classes)
topsort.py
-
gpi.topsort.topological_sort(items, partial_order)[source]¶ Perform topological sort. items is a list of items to be sorted. partial_order is a list of pairs. If pair (a,b) is in it, it means that item a should appear before item b. Returns a list of the items in one of the possible orders, or None if partial_order contains a loop.
-
Data Types & Communication
Most of the data communication between nodes is handled by the ‘functor’ module. The data type descriptions are all loaded at runtime by plugging everything under the ‘types’ directory.
dataproxy.py
This module is an extension for handling specific data types such as Numpy-arrays.
-
class
gpi.dataproxy.DataProxy[source]¶ Holds all file descriptor information for any object that is serializeable. The method functions facilitate serialization and deserialization on either side of the Proxy-Manager.
- NUMPY:
Numpy arrays must be segments that are smaller than 2GiB (2^31 bytes).
- NUMPY-MMAP:
MMAP file descriptors are passed through the proxy only if there are enough available resources (i.e. rlimit).
-
class
GLObjects.py
This module facilitates the manipulation of GL objects by maintaining a list of GL calls to be supplied to a GL renderer. These objects are pure python and can therefore be easily serialized for passing between Nodes.
globjectlist_GPITYPE.py
numpy_GPITYPE.py
-
class
gpi.types.numpy_GPITYPE.NPYarray[source]¶ The NPYarray type provides port enforcement for numpy multidimensional arrays (ndarray). The enforcement parms are type (ndarray), dtype, ndim, dimension range (drange), shape, and vec (the len of the last dim). Enforcement priority for aliased parms goes ndim->drange->shape. Although shape and vec can overlap, they are enforced independently.
-
class
python_GPITYPE.py
defaultTypes.py
Loading & Storing Node/Types/Widgets
loader.py
A pymod loader for managing loaded nodes, types, and widgets.
catalog.py
Also see the ‘library’ module for more information on storing these types.
Loading & Storing Networks
network.py
Classes for loading and saving each version of gpi networks. Each class corresponds to a particular network file description. Upon load, the network file type is determined and then the appropriate class is installed. On write, the latest network description is used.
-
class
gpi.network.Network_v1(fname, contents=None)[source]¶ The first version of the network interface compatible with the released GPI-beta. The file format is pickled list() and dict() objects. The original released header doesn’t necessarily contain a version number so network files w/o are assumed to be this version.
-
class
-
class
gpi.network.Network_v2(fname, contents=None)[source]¶ The second version of the network interface. This version supports new 2-level library scope which exists as an extra tag in the node settings dict. The file format is pickled list() and dict() objects. The original released header doesn’t necessarily contain a version number so network files w/o are assumed to be this version.
-
class
-
class
gpi.network.Network(parent)[source]¶ Determines the version of the file to be read, then chooses the correct loading object for that version. The loading object must translate the file contents to the various object settings that make up the network description. This object should handle the parent calls.
-
class
Compiling PyFI Modules
make.py
Use python distutils to build extension modules. This script can be called directly from the commandline to build C-extensions or check pure python extensions.
A C/C++ extension module that implements an alorithm or method.
- To make, issue the following command:
$ ./make.py <basename> or $ ./make.py <basename>.cpp or $ ./make.py <basename>.py
Command Line Interface
cmd.py
User Configuration
config.py
Templates
nodeTemplate_GPI.py
BORG: Building Outside Relationships with GPI
The interface for easily encapsulating/assimilating external command-line programs is internally called “external binary encapsulation” or ‘ebe’.
ebe.py
-
class
gpi.ebe.FilePath(wfunc=None, wdata=None, path=None, filename=None, suffix=None, nodeid=None, rfunc=None, asuffix=[])[source]¶ Generate a tempfile-name and path based on THIS object’s id. If THIS object looses its reference then make sure the associated file is also deleted. The supplied read/writer functions can be used to write and retrieve the file information. If a tempfile-path and name is all that is needed, then this object can be instantiated without any arguments.
path: /tmp (default GPI tmp dir) filename: additional to the nodeid suffix: additional to the nodeid (i.e. ‘.jpg’) nodeid: node’s location in memory (id()) rfunc: reader function with footprint:
data = rfunc(‘filename’)
- wfunc: writer function with footprint:
retcode = wfunc(‘filename’, data) retcode: None or 0 for success
If no names are specified then THIS object id is used.
-
class
-
class
gpi.ebe.Command(*args, **kwargs)[source]¶ This object simplifies the situation where an external program generates a file and potentially takes a file as input. These files need to be communicated as commandline arguments, and also need to be read and written from GPI.
in1 = FilePath(‘.cfl’, writer, data) out1 = FilePath(‘.cfl’, reader)
# run command immediatly Command(‘fft’, in1, ‘-o’, out1, ‘-d1’)
# setup a command list c = Command() c.arg(‘fft’) c.arg(in1, ‘-o’, out1) c.arg(‘-d1’) c.run()
data = out1.read()
-
class
Misc Features
sysspecs.py
A class for getting relevant system specifications. These can be used to display system information in the status bar, convey relative performance info in networks, etc…
logger.py
This is an initial attempt at logging GPI sessions. Currently all logging information is printed to stdout b/c there is a missing mechanism to communicate logging statements back from forked processes.
associate.py
File-node associations for data drag’n drop.
defines.py
Miscellaneous constants used throughout GPI. These could be for z-buffer, internal type conventions, uri conventions, etc…
console.py (PyQt classes)
syntax.py
Syntax highlighting from: https://wiki.python.org/moin/PyQt/Python%20syntax%20highlighting
docs.py